In the previous blogs of this series we learned What Web-to-Print is, What are its challenges and what is the planning process of implementing web-to-print. Moving forward, in this blog we will see how to execute Web-to-Print software integration seamlessly.
When you’re done will all the planning and once you have finalized a web-to-print software provider, appoint one person in your team from the IT department as the ‘project owner’, to liaise with them. This person will coordinate with the software vendor for any information related to the product, feedback, and approval at various stages of the implementation.
Ensuring that the web-to-print vendor also shares the kick-off document, containing the details for starting the project, is also the responsibility of the project owner.
It is only after the Person of Contact is decided and allocated responsibilities that you should start the implementation, which brings us to the next point, i.e., understanding the various aspects of the project execution phase.
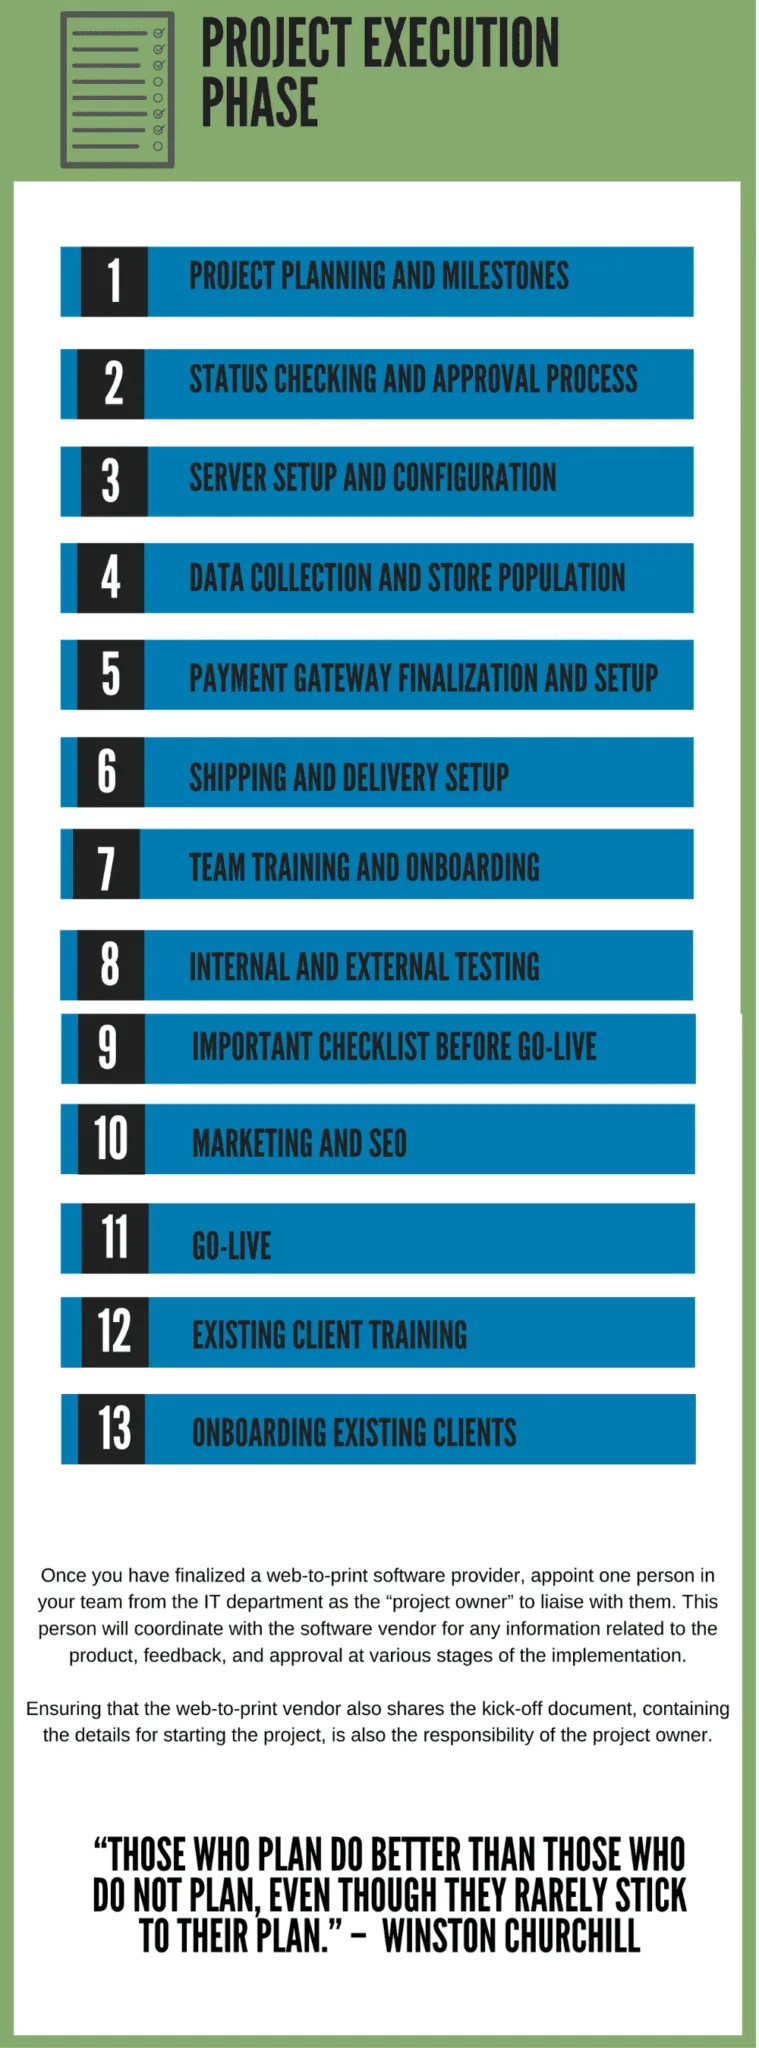
Step-by-step Guide to Web to Print Software Implementation for Printing Companies
- Project Planning and Milestones
- Status Checking and Approval Process
- Server Setup and Configuration
- Data Collection and Store Population
- Payment Gateway Finalization and Setup
- Shipping and Delivery Setup
- Team Training and Onboarding
- Internal and External Testing
- Important Checklist Before Go-Live
- Marketing and SEO
- Go-Live
- Existing Client Training
- On-boarding Existing Clients
Step 1 : Project Planning and Milestones
This is the stage where the web-to-print vendor shares the entire project plan; it includes setting deadlines against each milestone and stating all dependencies from your side. You should provide all the required information on time to complete the project.
For effective collaboration, your vendor could also use project management tools such as Zoho, Trello, or Basecamp. The use of such tools not only centralizes communication and reduces reliance on emails but also keeps it transparent and has everyone on the same page.
Step 2: Status Checking and Approval Process

The project owner should stay in touch with the web-to-print software provider team. After all, communication and collaboration are critical to the success of any project. The vendor will always check in with you and ask for your approval for each milestone they release.
That is where the project owner will talk to all your team members about it and then give the required feedback or input to the vendor.
Step 3: Server Setup and Configuration – Security, Backup Policy, Monitoring
For the project to be executed successfully, you need to be aware of the technicalities of your online printing website, as that will help you in smooth server setup and configuration.
A. Server specification
This is based on the number of website visits in a day, including the number of concurrent visitors on the site. You see, the web page loading speed is critical for successful conversions and high Google rankings.
The server plays a significant role in bringing the page load speed below three seconds. CDN and caching mechanisms should be configured on the server to meet the desired website performance.
The vendor will suggest the required operating system, CPU and hardware configuration, RAM, and bandwidth for the server once they have an estimate of the website visitors.
B. Server providers

These days, the cloud server or VPS server is the preferred choice of businesses where computing requirements can increase and decrease at run time. Amazon AWS and Digital Ocean are leading cloud service providers. You should choose one after careful consideration of the server specification given by your software vendor. Signing up for a demo will help you.
C. Managed server service
If you do not have an in-house person to set up and manage your server infrastructure, better look for it outside. Many web-to-print vendors also provide managed server services. You can either go with your vendor or hire another agency for the same. When deciding, make sure they offer 24/7 security, backup, and monitoring services.
Rather than allowing your internal team to manage it, partner with an agency that specializes in offering turnkey solutions for managed servers.
In addition, you should set up separate development, staging, and live server environments so that you can test every release on staging before it is deployed on your live server. This will reduce any chances of errors and disruptions on your online website.
Share server details with your web-to-print vendor so that they can release the beta version of the release for User Acceptance Testing (UAT) before making the changes live.
Step 4: Data Collection and Store Population
Merely implementing web-to-print technology is not enough. You need to share specific data points with the vendor to populate your website. That brings us to the six necessary elements that your team should prepare during the execution phase
A. Graphics and images
Providing the company logo, homepage banners, and other brand specifications to the vendor is the first thing you need to do to kick-off the project. Share the source files with them so that they can use the same font and color throughout the website implementation.
In case you don’t have a logo yet, then ask the vendor for the same and check if creating one is a part of the scope of work in the contract or not. If the logo is not part of their agreement, then outsource it to the vendor or hire the services of a graphic design studio – whichever fits your budget and timeline.
Similarly, you can choose the same route to sort out the web page banners, category page designs, and other graphics you may need for the website. All the visual content should follow the brand guidelines. Make sure there is consistency in all graphics and images.
B. Identify keywords relevant to you
Make a list of the keywords that your end customers may use to search your services. You can use a range of keyword tools such as SEMRush, WordStream, KWFinder.com, and Keyword Tool.
Consider the search volume and the level of competition before picking a keyword. High search volume and low competition should be your preference.
Finalize keywords for the homepage, category pages, and individual product pages. Create an excel sheet where you can list all the keywords for every page and also later use it to track the ranking in the same excel sheet.
C. Content writing for website

In this day and age, content is the essence of every website across industries. Without the written word, your site will look bland, and it won’t fetch you the search results you desire. Here is what you should focus on during the implementation:
>> CMS pages
While your web-to-print software provider works on the implementation, you can start working on the website content. Keep the keywords in mind while writing the content. You can hire a freelance creative content writer for the same.
Alternatively, there are many portals such as Fiverr.com and Upwork where you can post your content requirements and ask for the quotation to hire the one you like the most
>> Product description
Product descriptions are the trickiest to write because they have the ultimate power to attract potential customers. To get started, list all products in an excel sheet along with their keywords and then start writing the descriptions.
>> Initial blog entries
Every new website today must have a series of blog posts when it is launched. That not only helps in achieving high search rankings but also offering potential end customers something else other than the products.
Find out what topics are trending in your industry, using tools such as BuzzSumo and SEMRush, and blog about them. Alternatively, write on how your web-to-print software can add value to your potential customers.
D. Prepare a catalog sheet and product entries
While the web-to-print vendor continues to do their job, ask them for a product sheet format so that you can provide a list of products for them to import into the system at once. This is a simple task but a tedious one as it requires manual human intervention. Make sure the details fed into the sheet are without any mistakes.
E. Configure the product pricing
Convey your pricing formula to the vendor so that they can implement the same in the web-to-print software. Please note that you may have different pricing for different products.
For example, the price for screen printing will be defined by the number of colors in the artwork to be printed, and the artwork size and number of stitches for embroidery.
In contrast, your digital printing charges could be fixed on the quantity. Therefore, you need to convey your price list for all products in advance so that the vendor doesn’t make any mistakes while implementing the technology.
F. Create design templates

We would advise you to launch your web-to-print storefront with as many templates as possible. While the implementation phase is going on, hire a graphic designer or partner with a design team for creating professional and unique design templates that can make your printing store stand apart from your competitors.
Alternatively, you can even ask the vendor if they provide the service. But before any graphics are created, you must sit down with the vendor to understand:
- The template creation process
- What design file format the software supports
- Whether or not you can import your existing graphic design files, such as InDesign, PSD or SVG, directly into the system.
You can discuss the complete template creation strategy with them, including whether they use designing software such as Adobe Photoshop or InDesign, or whether they create designs directly in the web-to-print software using the template builder.
Before taking any call, have an in-depth conversation with your vendor. You can also use online image libraries such as Freepik for graphic designs, vector art, and stock photographs.
Templates make submitting print orders easy for your end customers. All they need to do is just choose the artwork and edit the text and images right on the website and preview the final artwork before placing the order.
Client convenience increases sales. Therefore, keep your target audience and industry in mind, and create templates which can make their lives easy.
G. Collect client testimonials and reviews for the website
If you are already in the print business, then you may ask your existing end customers to give testimonials in text or video format to put on your website. You can also ask for their photographs.
Testimonials with client photos create a more substantial impact on website visitors and influence their buying decision. You can also collect reviews on third-party platforms such as Trustpilot, YELP, PowerReviews, your Facebook page, or on the Google Business listing.
Step 5 : Payment Gateway Finalization and Setup
Constant cash flow is the lifeline of any business. That means you have to make the checkout process as easy as possible for your potential customers. They do not want to be bogged down by hidden shipping costs or, more importantly, lack of payment options.
Therefore, make sure you choose the payment gateway that is most acceptable in your region or country. For example, in North America, Stripe and PayPal are most satisfactory. You can also negotiate with the payment gateway providers on their fees based on your transaction volume.
Confirm with your web-to-print software provider the payment gateways they support, and check if they can integrate the system with your chosen payment gateway. Ideally, your finance department should take the initiative and sort it out.
Step 6 : Shipping and Delivery Setup
Once the payment gateway has been set up, choose a logistics provider. Configure their shipping costs in the system. This is so that the end customer is not kept in the dark while completing the checkout process and knows of any shipping charges beforehand.
Similarly, the logistics partner can also provide APIs for live shipping rates like how United Parcel Service and United States Postal Service do.
Automation is essential once you start receiving high volumes of orders. And through the application program interface, the logistics partner can be aware of the orders that need to be picked up and delivered, and by when.
Step 7: Team Training and Onboarding

After getting approval for each milestone release, the web-to-print software provider makes the project available for UAT. But before that, they conduct training programs for you and your team so that you all can be made aware of the new changes.
The training usually takes place via Skype, Zoom, or GoToMeeting. Many vendors divide the training session into various parts so that the new information can be easily consumed. You can ask your web-to-print software provider to record these training sessions for your team so that they can refer to them at a later date, if the need arises.
Your project owner needs to ensure that everyone from the team is available for the training. Their input and feedback are essential for successful implementation.
Step 8 : Internal and External Testing
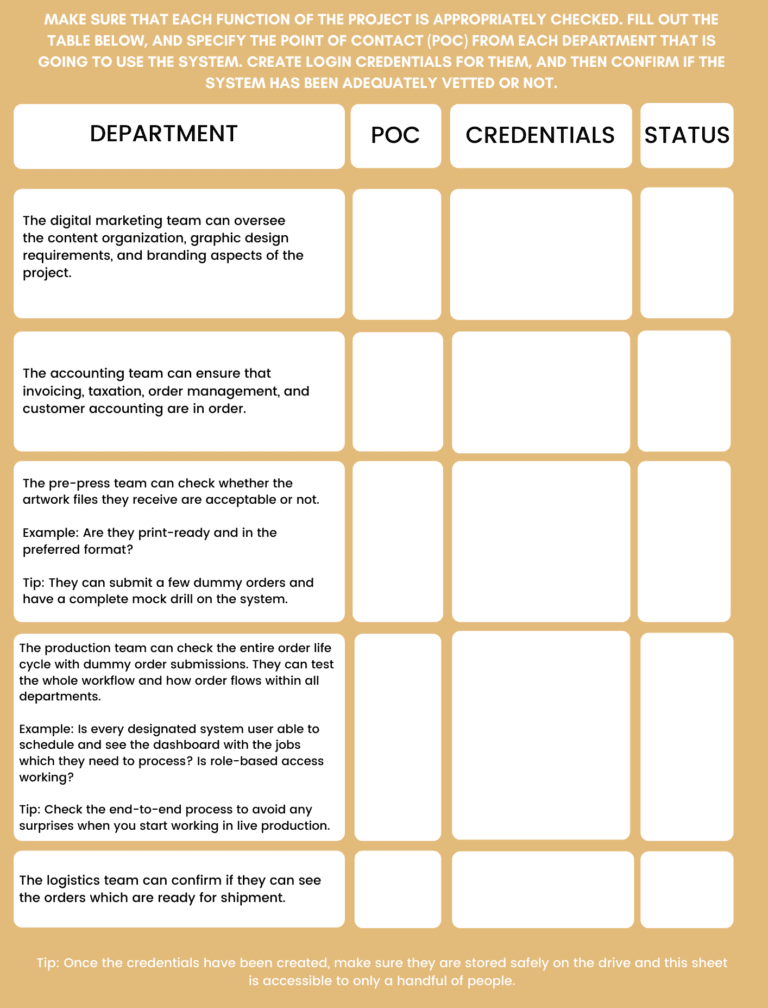
Once the training is complete, you need to create a real-time work environment in the system. This could include building workflows for products, departments, and teams in respective departments, and creating login credentials for each person who is going to work on the system on a regular basis.
Step 9 : Important Checklist before Go-Live
Before launching your web-to-print storefront, make sure you keep the following things in mind:
A. Website performance

Did you know that 53 percent of mobile users leave a site that takes longer than three seconds to load? [Google] That’s correct! Page speed has a direct impact on sales and conversion. The better the speed, the higher the conversion of website visitors into customers.
It is because of the importance of page speed on user experience that Google rolled out a new page speed update in their algorithm in July 2018. The tech giant gives ample weightage to those webpages that have a better page speed over those which are slow in loading.
You should also take a benchmark of three seconds for your website. Here is a list of best practices that can be applied for better web performance:
- Enable browser caching. That way, the main components of a webpage can be saved in temporary storage, and the browser can easily open the webpage without having to send another HTTP request the next time the user comes back to it.
- Limit and remove plugins. Only keep those high-quality plugins that your online printing website needs.
- Minify your CSS code. The more CSS files you have on your website, the more HTTP requests it is forced to make, thus slowing down the site
- Minimize your 301 redirects. The process creates a series of links that your browser must pass through to land on the new URL, thus slowing down the webpage loading speed.
- Optimize web images. Rescale them using tools such as TinyPNG.
B. Device and browser compatibility
Device and browser responsiveness is essential. By 2021, mobile commerce sales are expected to account for 54 percent of the total ecommerce sales. If your website doesn’t work well on the mobile browser or is not compatible, then you may lose half of your sales.
With the help of web-to-print technology, you can ensure your storefront is responsive on all browsers such as Chrome, Firefox, and IE, and across all devices such as desktop, mobile, and tablet. Convenience of your customer base is everything.
C. Initial feedback from clients, team, and friends
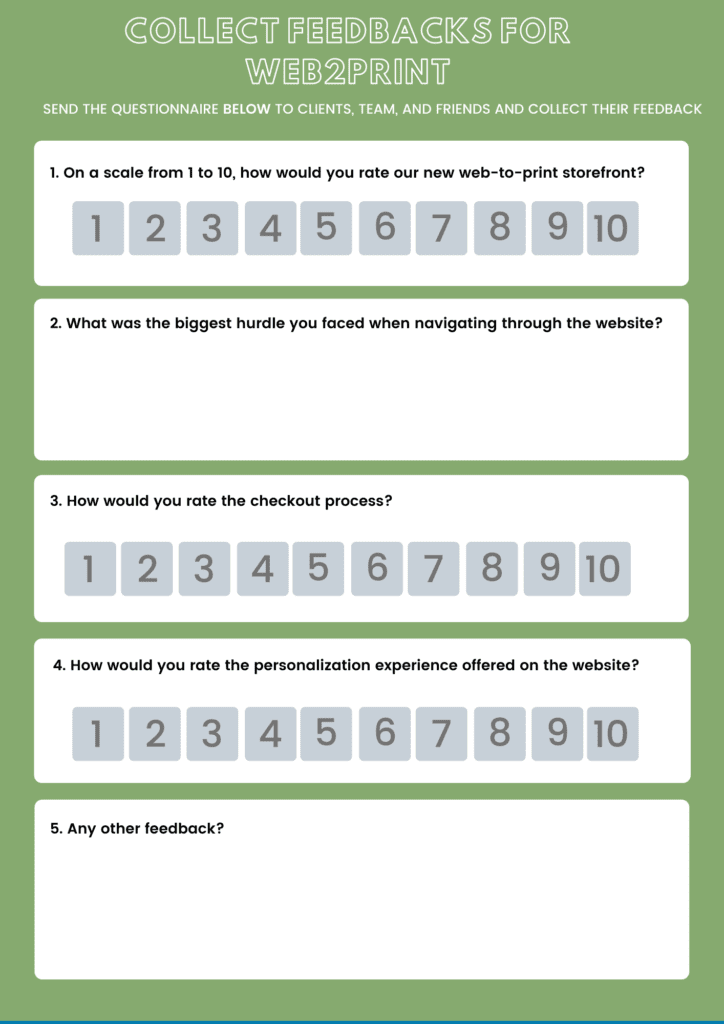
Once you are ready for launch, share the website URL amongst your team members, friends, and family so that they can give their point of view. But don’t just email them, asking them to buy from you. Instead, give them a coupon code that they can use to purchase a printed item.
Once they are done shopping and receive the order from you, send them a short questionnaire. The survey can be created on SurveyMonkey or Google Forms. Compile the feedback received and check with the project team what changes can happen quickly.
You can also approach your loyal end customers in the same manner and take their feedback on what they think about the new system.
Step 10 : Marketing and SEO
Marketing is a useful tool for earning customer trust, generating site traffic, nurturing qualified leads, and more. Therefore, when you are about to launch your storefront, make sure your content is SEO-optimized and geared towards the target audience
A. Identify keywords relevant to you
Make a list of the keywords that your end customers may use to search your services. You can use a range of keyword tools such as SEMRush, WordStream, KWFinder.com, and Keyword Tool. Consider the search volume and the level of competition of the keywords.
Finalize words for the homepage, category pages, and individual product pages. Create an excel sheet where you can list all the keywords for every page and also later use it to track the ranking in the same excel sheet.
Here is an example of the keywords most popularly used in the print industry:

B. Write meta descriptions and titles for product and category pages
Once you have finalized the keywords, the next step is to finish writing these SEO-focused copies. Writing meta descriptions and titles is an art because not only do you have to explain a specific page in an attractive manner but you also have to do it within a set character limit.
Put primary keywords in the page title and the secondary keywords in the description. We did it for our homepage, as shown below.
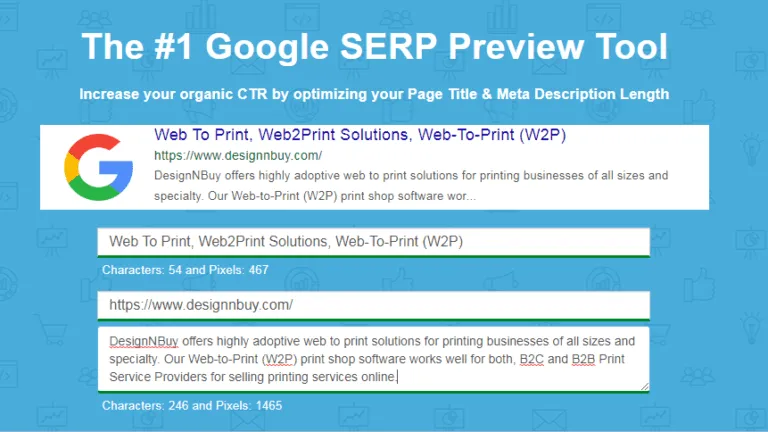
It would be best if you wrote in such a way that you cover most of your page keywords in the title and meta description without stuffing them. The title should not be more than 60 characters, and descriptions should not be more than 156 characters.
C. Get the right page structure
Once you have all the keywords, you need to target and have written meta titles and descriptions for each page; you should focus on creating structured pages on your existing website.
Let us quickly go through H1, H2, and H3 heading formats and how they are essential for local SEO to improve your website rankings on search engines.
First things first: The headings make browsing through the website easier for consumers. When they find the title tags and heading phrases to be the same, they can relate to the content better and are more likely to pursue the website more.
Search engines present results to users based on the keywords they used to search, appropriate keyword density, and relevancy of the same on your website.
D. Set up the initial email format and design
Make sure that before you go live, all of your transactional emails should be as per your brand guidelines. From Order Email, Shipment Email, and Invoice Email to Customer Registration Email and Forgot Password Email – the content should also include your company details.
Also, design a few promo emails and newsletters beforehand, so that you only have to customize the content later, before scheduling them.
Step 11 : Go-Live
Step 12 : Existing Client Training
After you have done the preliminary testing, request your existing end customers to try out the website, and arrange a live training session for them on how to use the new system. Also, ask them to sign up on it and create user accounts.
Step 13 : Onboarding Existing Clients
Change is often met with resistance, so don’t be surprised if your end customers find it troublesome to use web-to-print software.
Therefore, when you share the website URL amongst your clients, also give them a coupon code that they can use to purchase a printed item. Whenever they place an order from their systems, give them a referral code, a coupon code, or run a 1+1 free sale.
Incentivizing always works when you want to get people to shop something from you quickly. After all – who doesn’t love discounts or freebies?
Work with the Web2Print Experts to Grow Your Print Business
Value addition is essential for our clients, which is why we have focused extensively on ensuring you received the maximum level of freedom possible to customize and upgrade your web-to-print storefront solution.
Partnering with industry-leading experts like DesignNBuy can be a game-changer for your print business. With DesignNBuy’s expertise in Web-to-Print solutions, you can leverage cutting-edge technology to streamline your print operations, offer personalized customer experiences, and drive business growth. Whether you’re looking to enhance your online presence, optimize your print processes, or elevate customer satisfaction, DesignNBuy brings tailored w2p solutions to help you thrive in the competitive print industry.
So, what do you think? Interested to know what is in the store for you? Sign up here to book a consultation.

